How to Make a GIF with Your 7D Mark II's 10fps Burst Rate
I previously outlined how to use Microsoft Cliplets to turn video clips into animated GIFs. This time around, I'm going to show you how to use the 7D II's awesome burst rate capability and Adobe Photoshop to do the same thing (I like this way better, actually).
First, let's set up the 7D II for optimal capture of GIFs.
- This may be the only time you'll ever hear me say this – set your camera to JPEG (Large, or better yet – S1 or S2).
There are several good reasons for setting your camera to capture JPEGs in this scenario. First, you'll want to be able to capture a consistent 10 fps burst for an extended period of time which would exceed the camera's buffer if shooting RAW. Second, shooting in JPEG will lessen the post-processing burden. The GIF at the top of this post was created using 60 images that were captured in a single burst, meaning my Photoshop file had 60 different layers right from the get-go. Unless your post-processing machine is a beast (mine isn't), your computer may slow to a crawl if you try working with a Photoshop PSD that has 60 (or more) 20+MP layers. As your end goal is to create a rather small GIF (that utilizes 256 colors at the most), you just don't need the benefits of RAW or even the camera's full resolution (unless you plan on cropping heavily). Shooting in JPEG S1 (2736 x 1824 pixels) or S2 (1920 x 1280 pixels) should provide plenty of resolution for most GIF applications. - Use a tripod and a remote release.
Most of the best GIFs have a large percentage of static imagery in the scene with a little bit of movement to capture your attention. As such, using a tripod ensures that the static parts of your scene stay just that [static] allowing for the moving parts of your scene to have a good frame of reference. Also, a remote shutter release (either corded or wireless) will help make the capture process easier. - Set your camera to Manual Mode with High Speed Burst, Manual Focus and a relatively low ISO.
These settings (along with recording images as JPEGS) will allow the camera to maintain its maximum burst rate for as long as you need to record the action you're looking to capture while the locked down exposure settings and focus ensures your scene remains static in composition and exposure (except for your moving subject, of course). - Choose your scene and fire away.
It may take several tries (and several hundred frames) to get the action you're looking for. Regarding the traffic GIF above, I probably shot 400-500 images because I couldn't actually see what or how much traffic was coming (the buildings blocked my view). Timing my burst to start just before the cars appeared was challenging, but after a few attempts (and a lot of long bursts) I had the images I wanted.
Now for the post processing...
1. If you shot in S1 or S2, you can probably move on to Step 2. Otherwise, you'll likely want to resize (and possibly crop) your images to reduce your post-processing workload. In my opinion, most photo GIFs work best in the 640-800 pixel range. You might also consider changing the aspect ratio of your images here (16x9, maybe?). For resizing my images, I generally use CoolTweak if I don't need to do any cropping. Once you've resized and/or cropped your images, you're ready to load the resized images into Photoshop.
2. In Photoshop (I'm using Photoshop CC), go to File --> Scripts --> Load Files Into Stack. In the following pop-up window, browse to and select your reduced sized images and click "OK." Wait for Photoshop to load the images.

3. Go to Window --> Timeline. The Timeline Window should appear at the bottom. Click "Create Frame Animation."

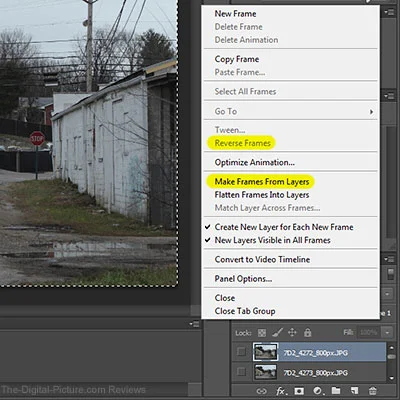
4. In the top right corner of the Timeline Window, click the options button and select "Make Frames from Layers." You may also need to choose "Reverse Frames" in the same menu if your frames are playing in the wrong order (which is likely).

5. Now you can press the Play button in the Timeline Window to see a preview of what your GIF will look like. At this point, here are some things you may want to do...
- Add adjustment layers above the top-most layer in the Layers Palette. These adjustments will be applied to all the frames.
- If there are long pauses in your sequence that you'd like to get rid of, you can simply delete the unnecessary frames from the Layers Palette.
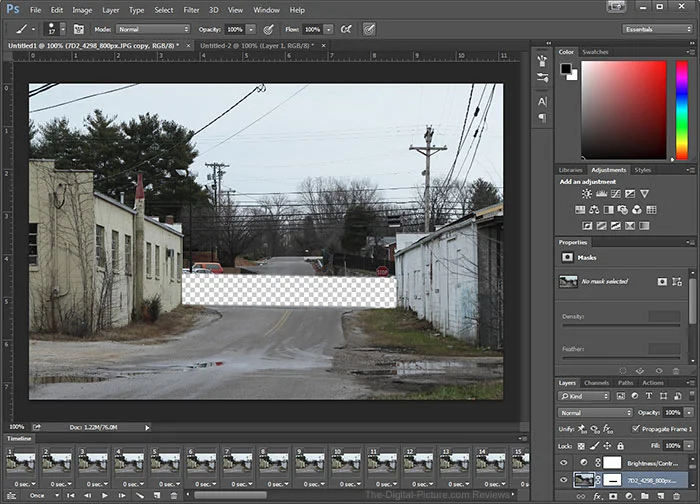
- If you notice distracting elements in some of the frames, you can use a base frame and mask out areas in it that you do not want to change over the animated sequence. Find the frame that you want to use as the base frame in your Layers Palette and Right Click --> Duplicate Layer. Now move that duplicated layer above all the other layers, apply a white layer mask and paint black over the areas of your frame where the movement occurs that you want to capture throughout the sequence. You can see my base layer below.

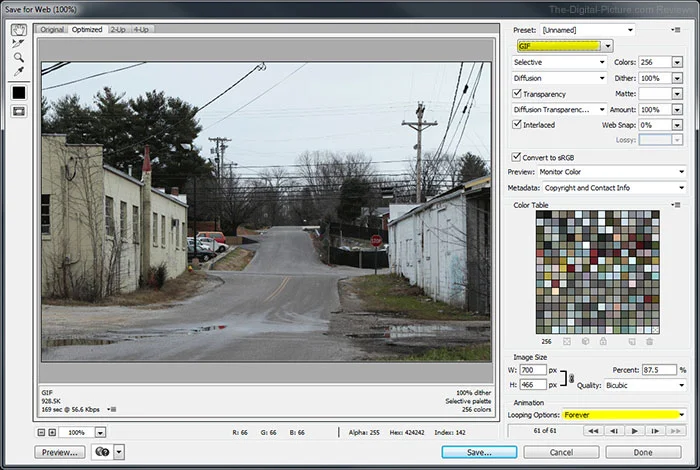
6. Once you have your GIF sequence edited, hold down CTRL + SHIFT +ALT + S (on Windows) to bring up the Save for Web window. Choose GIF from the drop-down menu, select "Forever" from the Looping Options menu and tailor the other settings to suit your needs (you can see which settings I used below).

7. And now you have your GIF! For easy sharing on social networks, you can upload your creation to Giphy and they will provide the embed code that you can use to share your GIF.
Check out Bryan's full review of the EOS 7D Mark II for more information on this full-featured (and fun) camera.

