Sensor Cleaning

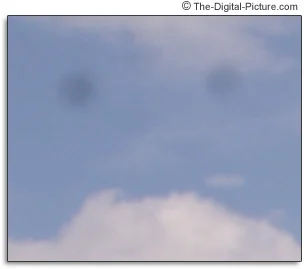
What are those dark spots in the sky? One of the most-frequently asked questions I receive relates to sensor dust and cleaning. Some people know they have sensor dust while others only know that there are spots in their images. Some even blame the spots on their lens. Though while logical at first, it takes a sizeable piece dust on/in a lens to show up as a prominent spot in a picture - especially if it is on the front lens element.
To know if your sensor is dirty, you need to know what sensor dust looks like in an image - see below for a 100% sample crop from the above photo. Notice the frowny face? That's what my face looks like when I see a picture like this.
To check for dust, mount a 50mm or longer lens on your DSLR - select 50mm or longer if you are using a zoom lens. Find an evenly-light-colored, evenly-lit background for a test shot - a blue sky (works great), a white wall, a piece of paper ... many subjects work. Set the lens to manual focus and set the focus to to make your selected subject completely OOF (Out of Focus). We want to see the dust - not the subject - in the picture. Adding motion blur to your test image is all-the-better. I generally use infinity focus and often use a white kitchen cabinet as my subject. You may want to turn off IS if your lens is so-equipped though it won't hurt to leave it on. On the camera, set your exposure mode to Av, ISO to 100 and - very important - set the aperture to a very narrow - at least to f/22. You likely won't see even large pieces of dust when shooting at very wide apertures, so be sure to choose a narrow one. Take the test picture.
If your sensor is dirty, you will see spots in your test image. They are especially easy to see if you load the test shot into your computer and increase the contrast. I find that reviewing the test shot on my LCD is faster and works just fine. Zoom into 2 or 3 levels short of max LCD zoom and pan through the image systematically looking for spots. Remember, the location of the dust on the sensor will be exactly opposite of where it appears in the image on the LCD (the lens flips the image, the camera de-flips it for viewing). When you turn the camera 180 degrees to look into the chamber, the spot will now be flipped up/down only.
I don't worry about a small sensor dust particle or two (or possibly 3 ...), but anything significant causes me to take action.
Canon will provide sensor cleaning service for you (which is the only "official" recommendation I can give) or you can do it yourself. The last sensor I had cleaned by Canon was returned dirtier than it was before I sent it to them. And I can't wait for a camera to ship to/from Canon every time I need my sensor cleaned, so I, like most other photographers have embraced the alternative - Do-it-yourself sensor cleaning. Before I go any further, I must make the DISCLAIMER: I have not seen Canon recommend any do-it-yourself sensor cleaning method other than the Giottos Rocket Air Blower non-contact method (in the Canon section of PhotoWorkshop). You are accepting complete liability for any damage you cause by using any of the methods described here. My opinion is and my experience shows that fear is not necessary - but some patience and carefulness are important. And though we call it "sensor cleaning", we are actually cleaning the low-pass filter that sits on top of the sensor. You need to read this entire page before proceeding.
There are many sensor cleaning methods - and I find that several different ones are needed at various times. I start with the easiest and least intrusive cleaning method and move down my list until I have a clean sensor.
At this point, you need a well-charged battery in the camera - If the battery dies while you are accessing the sensor, the shutter and/or mirror could be damaged. The camera will likely not permit access to the sensor if the battery is not adequately charged. You should also find a clean, well-lit work area. Since the camera sensor will be completely exposed, you need to avoid dust floating onto it. I generally use the counter in my kitchen or bathroom - with no windows open.
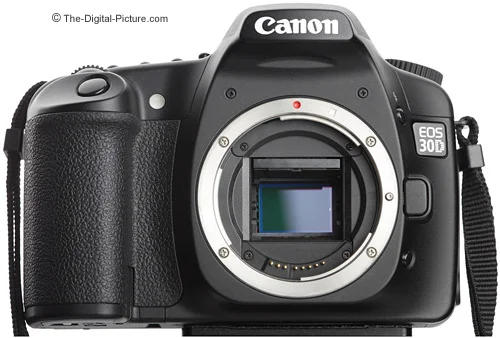
To clean the sensor, you need to gain access to the sensor - seen exposed in the photo above. Your manual will give you instructions for doing this, but I'll give you some as well ...
There is generally a menu option entitle "Clean Sensor" on the camera. Find it, select it and affirmatively answer the prompt asking if you really want to do this. If you hear the mirror lock up, your camera is ready - otherwise your camera requires the shutter release to now be pressed to yield access to the sensor. Your sensor is now exposed behind your lens.
We are going to remove the lens next, although you could easily have done this first. I remove the lens prior to opening the sensor up for cleaning when I want to clean above the mirror. I infrequently clean this area using gentle squeezes from a Giottos Rocket Air Blower. Blowing dust in this area can push it into the viewfinder/focusing screen area - take warning of this.
Angle the camera body downward and remove the lens, quickly covering the rear lens element to prevent dust from landing there. I simply put a rear dust cap on the lens. The lens-less camera is angled downward at all times unless I am actively cleaning the sensor. The downward angle uses gravity to our advantage - it prevents additional dust from landing inside.
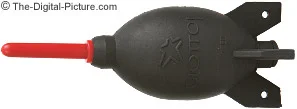
My first sensor cleaning step is a non-contact one - the one that Canon specifically recommends - blowing air onto the sensor from a Giottos Rocket Air Blower. The risk of damage from this method is light - but the cleaning power is also light. The potential for the blower to remove a piece of grit that might later scratch the sensor during a contact cleaning method makes this step important. While holding the camera in my one hand - still pointing downward, I firmly squeeze the air blower which is carefully positioned near the camera sensor. This air blower fills from its base and expels the air from the nozzle - It does not directly blow the same dirty air back onto the sensor. Be careful not touch the sensor or other fragile parts nearby (like the shutter) with the tip of the air blower. I typically use 8 or ten good air bursts.
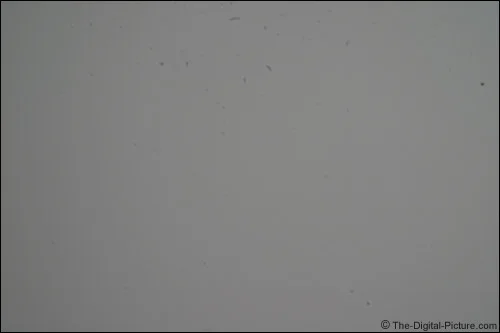
Between each cleaning method attempt, another sensor test is needed to find out if the process can be ended at this point - or an additional cleaning method employed. Turn the camera's power off to end the sensor cleaning, remount the lens and run another test. The sample above shows a sample picture from a Canon EOS 30D with a very-dirty sensor. Move your mouse over the sample image to see the blower-achieved results. If you are satisfied, you are done. Otherwise, read on ...
<UPDATE 03/27/2010>
At this point in the cleaning process, I am now using Visible Dust Sensor Cleaning Swabs.
Another disclaimer: I have not seen Visible Dust or anyone else recommend the swabbing method I am going to describe - so you are on your own if you try this.
What is working great for me for normal light cleaning (no oil or other stuck on dirt), is a dry sensor cleaning swab. Adding a cleaning solution to the Visible Dust Sensor Cleaning Swabs is what is recommended, but I find it very hard to get all of the lint off of the sensor when using the wet method. If there is serious dirt on the sensor, I definitely use the wet method - which involves adding a very small amount of the proper cleaning solution to the tip of the sensor swab and proceeding as with the dry method described here.
In a relatively dust-free environment, I hold the camera up with the lens mount facing downward so that gravity will cause any dust to naturally fall out. I carefully place the swab into the sensor chamber (being carefull to not touch the chamber walls) at a somewhat acute angle and so that it touches one end and side of the sensor. As I swipe in one direction while applying gentle pressure, I reduce the angle of the swab until it is completely vertical at the other end of the sensor.
Think of reaching far away from you with a broom and sweeping toward yourself. When the broom is farthest away, it is at an acute angle. When the broom is at your feet, it is vertical (a right angle). This action will tend to lift dirt instead of pressing it into the sensor cover surface.
When the sensor cleaning swab completes a full pass along one edge of the sensor, I blow the swab off with the Rocket Blower (though I probably should use a second swab) and flip it over. I run the swab down the other side of the sensor the same as the first.
Now there is a chance that some dust has been deposited on the side you were swiping to. So I blow the swipe off and gently run the corner of the swipe along the potentially-dirty side of the sensor and lifting out from the corner. Throw the swab away at this point - consider it contaminated.
I follow this sensor cleaning method with more bursts of air from the Rocket Blower.
I have been using this sensor cleaning method for years now with a success rate around 95%. Cleaning time (with supplies in front of you) is a couple of minutes at this point.
If the sensor is still dirty, I usually repeat with another dry cleaning - or possibly a wet cleaning followed by another dry cleaning for final cleanup.
<END UPDATE 03/27/2010>
What I was doing before the Visible Dust Sensor Swab method is ...
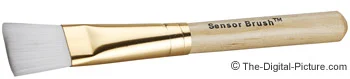
If I do not have a satisfactorily clean sensor after using the air blower, I usually move on to a sensor brush. The sensor brush is more capable of cleaning than the air blower alone, but it still presents a relatively low risk of damage to the sensor - IF you keep the brush clean. I am currently using a Visible Dust Sensor Brush but I understand some of the other sensor brushes work well also. The Copper Hill Images Sensor Sweep II looks good to me as well - and it is far less expensive.
Visible Dust recommends statically charging the bristles - with compressed air for the model I have. I simply use a series of quick bursts of air across the bristles from my air blower - this seems to sufficiently clean and somewhat charge the brush, but I'm sure compressed air would work even better. Visible Dust makes many variations of their sensor brush including some with battery-powered spinners (Arctic Butterfly) for cleaning/charging the brush. Just like when using the air blower, I hold the camera angled lens mount-downward for the brush cleaning - taking advantage of gravity. Good lighting aids in this operation.
Start at one side of the sensor and smoothly progress to the other side - being careful to not get the brush against any other part of the camera. I clean/charge the brush after each pass and make 6 or 8 passes per cleaning attempt. I follow up the brush cleaning with some bursts of air from the air blower - just like in the previous step. Turn the camera's power off to end the sensor cleaning and remount the lens as soon as possible to prevent additional dust from entering the camera. Store the brush clean in a protective case/bag. These first two cleaning methods (blower and brush) can also particles that may scratch the sensor during heavier contact cleaning methods later.
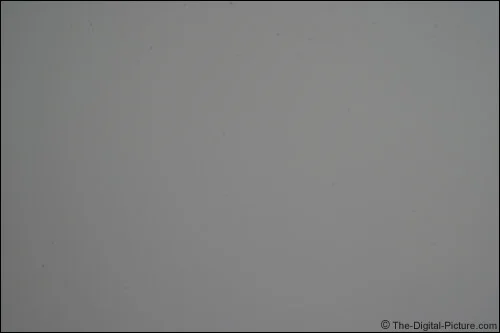
A dust test comes after every cleaning attempt. And as always, if the sensor is satisfactorily clean, the project is over. Sometimes it is, sometimes it is not. The above image shows the before and after (hover mouse over image) sensor dust sample images. The test shows that I have at least one spot remaining (bottom-left)- and there are more not as visible in this downsized image.
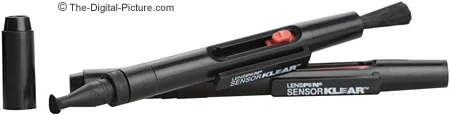
If still not clean, I next use a SensorKlear pen from LensPen (or one of the other brand names it is manufactured under). This is a small, inexpensive and easy-to-use pen-shaped device with a shaped cleaning head that is not wet and does not dry out. The SensorKlear has a brush, but it is not recommended for the sensor (why not make the brush a sensor brush? I don't know ...) I simply rub the cleaning tip in a back and forth pattern over the sensor. You may need to do this a couple of times. I typically place the camera lens-mount-up on a safe, non-marring clean surface under very good light when using the SensorKlear. I can sometimes see the dirt on the sensor this way and can attack it directly using the SensorKlear. As usual, I use the air blower after cleaning with the SensorKlear and then promptly power-off the camera to close the mirror and shutter. Install the lens and test again. Another mouse-over image - looks clean to me.

If the sensor is still dirty, my last method of attack is the wet method - meaning I am going to use a liquid cleaner on the sensor. Wet swabbing the sensor is the most intrusive cleaning method but it is also the most powerful. At this point in my sensor cleaning career, I was using little cooking spatulas modified to fit the sensor size I am cleaning (see pic below) with 1/4 of a Photographic Solutions Pec Pad Wipe taped to them (commonly referred to as the Copper Hill Method). What works best are the ready-to-use Sensor Cleaning Swabs by Photographic Solutions and Visible Dust. These swabs are rather expensive, but I they are worth their price to me.
I doubt you will find many recommending that the Pec Pad be cut into 4, but I find the smaller amount of material is easier to get in and out of the sensor chamber. And I haven't had a problem with the cuts causing loose fibers. Actually, having less material has caused fewer fiber to get loose in the sensor chamber as the pad is less likely to catch the sides of the chamber. You really do need to avoid touching the sides of the sensor chamber with any part of the swipe as the rough, non-glare sides are good at pulling fibers loose. Saving money is not an issue because the Pec Pads are cheap to begin with.
I simply wrap the 1/4 Pec Pad over the end of the spatula swab and wrap the sides that extend past the swab around the sides - making sure the end of the swab has a smooth swiping surface. I snugly wrap some thin tape around the pad to hold it in place. I usually setup 2-4 of these in preparation for cleaning and place the clean end so it is suspended in air (such as hanging over the edge of a counter). I make sure the clean end of the pad touches nothing except the cleaning solution and the sensor.

The "wet" part of this method is Photographic Solutions Eclipse E2 CCD/CMOS Sensor Cleaning Solution or Photographic Solutions Eclipse Optic Lens Cleaning Solution (methanol). Check the individual product reviews to determine which your sensor requires. I apply about two drops of Eclipse solution onto the swipe - one on each end of the tip of the pad.
Apply too much solution and you might leave a streak on the sensor (the SensorKlear can remove it). It helps to let the Eclipse solution soak into the Pec Pad or Swab for 10 or 15 seconds, but do not allow it to evaporate as it does so rapidly.
As with the SensorKlear method, I place the camera lens-mount-up on a safe, non-marring clean surface under very good light - in a dust-free environment as always. I carefully place the swab into the sensor chamber at a somewhat acute angle and until it touches one end and side of the sensor. As I swipe in one direction while applying gentle pressure, I reduce the angle of the swab until it is completely vertical at the other end of the sensor.
Think of reaching far away from you with a broom and sweeping toward yourself. When the broom is farthest away, it is at an acute angle. When the broom is at your feet, it is vertical (a right angle). Once vertical at the other end of the sensor, I slide the swab to the other side of the sensor without lifting the swab. I then lift the swab, create an acute angle in the other direction and swipe from the position the swab was lifted from to the other side of the sensor - reducing the angle again until the swab is vertical at the other end of the sensor.
The idea behind changing the angle of the swab is to continuously have a fresh part of the pad touching the sensor. This rotating can help lift the dust from the sensor surface - and may prevent a piece of grit from causing a scratch. I discard the used Pec Pad after each set of swipes - they are so cheap (especially when you cut them in 4) that it is silly to risk damaging the sensor with a dirty pad. I usually perform at least two sets of swipes during each cleaning attempt.
As always, I blow the chamber with the air blower and retest. If the sensor is still dirty, I usually repeat the wet cleaning until I'm satisfied. I may use the SensorKlear again as well.
When the sensor cleaning is finished, clean up and reset your camera to your normal settings. Be sure to set focus to AF.
Be careful, relaxed and patient while cleaning your sensor, you will do a better job.
Relaxing will become easier after you become familiar with sensor sensor cleaning.
Lots of additional online resources for sensor cleaning online.
What I've outlined is what works for me.
So how do we keep dust off of the sensor in the first place?
Well, you may not be able to prevent it - DSLRs often have with dirty sensors right out of the box.
But aside from that, a little care can minimally prolong a necessary sensor cleaning.
I change lenses a great deal and generally need to clean my sensor every 5-10 weeks.
Probably the most significant dust-prevention you can do is to change lenses quickly (but still carefully) in a dust-free environment. On a windy day outdoors, the amount of airborne dust is extremely high. Similarly, keep the rear lens element clean - use your Rocket Air Blower before installing a lens if necessary. Keep the camera body and exposed lens element pointing down as much as possible when their caps are not on. Misaligned lens and body caps can cause a small amount of material to be shaved off - align them carefully.
Professionally reviewing cameras and lenses for over 20 years, using interchangeable lens cameras for over 40 years.
 |
|