Watch the Background!
When taking pictures, we concentrate intently on our subjects -
but what about the background?
Upon later inspection of our photos,
we often find the background detracting from an otherwise great shot.
Taking control of the background can help turn a snapshot into a beautiful photo.
The first step to improving the backgrounds in our photos is to be conscious
of the background's importance to our photos.
We must know that the right backgrounds can make our shots stand out.
This often means simply paying attention to what is behind out
subjects during our photography sessions.
Unfortunately, the complete solution is not nearly as simple.
The normal goal is to keep the subject as the center of interest in a picture
(not to be confused with the center of a picture).
Your eye should be drawn to the subject in the final image,
and the background must not be distracting from the subject.
Shots must be setup to take advantage of a clean or pleasing background.
Here are some suggestions ...
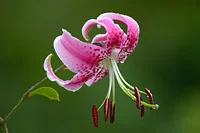
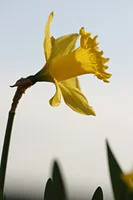
My first suggestion is to utilize your lens to throw the background out of focus. The depth of field (amount of in-focus distance) in your picture needs to be reduced enough so that the subject is sharp and the background is blurred. Notice how the Lily stands out against its background in the above picture. There are no distractions. A combination of factors allows your lens to accomplish this task.
First, open the aperture wide.
All other factors being identical, a wider the aperture yields a shorter depth of field.
How wide? Experience is the best teacher here.
The above picture was taken at f/2.8.
Experiment!
In conjunction with using a wide aperture setting comes using
a lens that has a very wide aperture such as the
Canon EF 85mm f/1.8 Lens.
It can create a blurred background much more easily than a slow lens
(such as the Canon EF 24-85mm f/3.5-4.5 lens).
The fast lens has much more latitude on the wide end of the aperture than the slow lens.
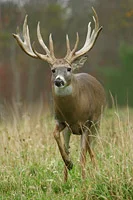
Another way to get a more diffusely blurred background is to use a lens with
a long focal length such as the
Canon EF 70-200mm f/2.8 L IS Lens
used for the above Monster Buck picture.
It will be much more difficult to blur a background with the
Canon EF 16-35mm f/2.8 L Lens.
All focal lengths yield the same depth of field when used at
the same aperture setting and subject framing.
But, the image compression a telephoto focal length provides magnifies the already blurred background.
The result is a background that appears more diffusely blurred.
Using a higher focal length has the additional advantage
of including less background in your picture.
A higher focal length lens has a smaller angle of view.
Pretty simple - less background in your picture leaves less room for distraction.
This may be a reason to choose the
Canon EF 180mm L USM Macro Lens
over the Canon EF 100mm USM Macro Lens.
Again, less background in the picture reduces the chance of distractions.

To utilize the depth of field provided by a lens, consider increasing the subject-to-background distance. The farther the in-focus subject is from the background, the more out of focus the background will be. Put lots of distance between the subject and the background. For indoor shots, you might put the subject in front of a large, (clean) window. The Columbine flower picture above utilized a window for the background.
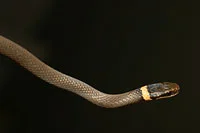
How about a reason to use a narrow aperture setting?
The snake picture above utilized a
bright flash/narrow aperture setting to make the
close subject's background turn completely black.
This is possible even in bright daylight if your subject is close enough
- as was the case in the sample picture.
I employ this tip frequently in macro photography.
A slight revision of this technique works with more subject-to-camera distance
but requires very dim lighting - or complete darkness.
Try night photography outdoors!
Flash shadows on the background are non-existent when using this technique.
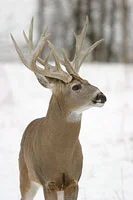
A common photography mistake is to have competing lines going through the background of your subject. In the example above, the tree row cuts through the buck's antlers degrading the picture. Another common example is a bright skyline going through the back of a person's head. The high contrast line will be very distracting.

To avoid an unpleasing background, find a different angle for your shot.
Get down low to use the sky as a background (example above left).
Some of my favorite shots were taken while I was laying flat on the ground or floor.
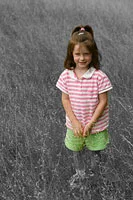
Getting above your subject allows the lawn or even your carpeting (example above right)
to function as your background.
At your own risk of course, get up on a counter, step ladder, chair or other stable
object to get the angle you want.
Keep in mind that the background needs to have a complementing and pleasing
color scheme.
Clashing colors are clashing colors - avoid clashing colors.
Find a different location.
Your subject may need to select different clothing.
This rule applies regardless of the background being in or out of focus.
Unless you are looking for a special effect,
you need to be aware of the relative brightness of the background.
There are exceptions to this rule, but having background objects
that are brighter than the subject will often be distracting.
Your eye will typically be attracted to the brightest part of the picture.

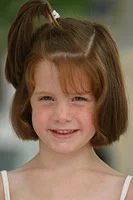
If you can't find the right existing background, add your own. Many backdrops/backgrounds are commercially available. A simple and inexpensive backdrop is a very large sheet of white muslin fabric. This makes a very pleasing background for portraits (example above). Build a PVC pipe frame to hang it over and you are set.


For a lower budget approach, employ a white or black sheet. Black velvet was used for the above/left baby picture - it makes a very nice background material. The above/right picture was simply a bed comforter. Be creative!

For a very low cost background, try construction paper. The background in this butterfly metamorphosis picture (above) is a piece of black construction paper.
Post processing techniques for removing, modifying or replacing the background abound.
One amazing tool for accomplishing this task is Adobe Photoshop.
One such Photoshop technique is selective coloring.
If you have a photo with a cluttered or distracting background,
it may be a candidate for selective coloring.
Selective coloring starts with the creation of a duplicate image layer in Photoshop.
The second layer is converted to black and white and turned into a layer mask.
The layer mask is carefully painted in black and white to
allow or disallow the color layer to show through.
The result is a black and white background and a subject in full color.
Selectively colored pictures are attention getting!
Here is an example ...
What about landscape photography? Landscape photography is all about beautiful backgrounds. The rules are a bit different here because the background is your subject (you don't want it out of focus). You must be even more attentive to what makes its way into your background. Typically, avoiding items such as wires, telephone poles, unattractive buildings, ... will make shot pictures better. If such objects are unavoidable, remove them later with Photoshop!

When all else fails (or you just want a different look),
fill your frame with the subject.
If there is no background, there will be no background distractions!
This technique works well for portraits of people.
Also, try this at the zoo.
Remove the man-made surroundings from your zoo photos by framing the subject very tight.
The Cardinal picture above uses this technique.
To summarize the above tips ... Improving your
photography involves deliberately including or excluding the background from or
in your photographs. Getting started is easy - simply be aware!
Professionally reviewing cameras and lenses for over 20 years, using interchangeable lens cameras for over 40 years.
 |
|